This was supposed to be an all-crochet pattern, but I ran out of time and also couldn't find grey yarn at Dressew.
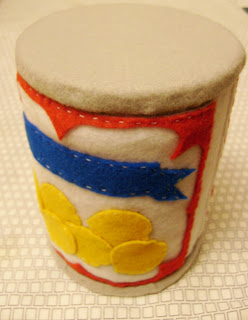
One of my oldest friends is having a baby, and she doesn't know the gender. So for her shower, I asked if there was a theme for the baby gifts (i.e. froggies, or duckies, etc.). She said "chickpeas" just to mess with me. I accepted the challenge, and I made this:
It's a plush can of chickpeas (but of course you could make it peas, or chicken noodle soup, or peaches, or whatever else comes in a can).
If you wanted to make one, I used an empty 2L pop bottle, and cut off the ends to form an open cylinder.
I bought felt from Dressew for $0.49 per sheet. The best part was that the felt is made from 100% recycled pop bottles - it's called eco-fi (link here to their website). Cheap and green!
If it was a full crochet pattern, I would make two circles for each end (from a pattern like this), and for the cylinder (sides), I would chain until it reached the width of the pop bottle cylinder, and then single crochet back and forth to make a rectangle long enough to overlap. (You'd have to make two of them - one slightly shorter in length to go inside the pop bottle frame).
 |
| Jagged plastic edges grabs at the felt, so masking tape came in handy. |
The felt wasn't quite long enough to wrap around the bottle, so I had to join two pieces. I used Aleene's Tacky Glue (every craft drawer should have this glue!), and I also hand stitched the seam.
Next, I pinned and glued the sheet around the pop bottle frame.
And I made a similar one for the inside.
To make the label, I marked where on the 'can' portion I thought the label should sit, and cut the white felt (my label backdrop) to this width. I glued and stitched over the seam as before.
I think the best part of this project was designing and stitching together the label. Bold colours and clean lines create the boldest effect.
Top-stitching over the felt shapes helped secure them (I glued them first), and also really helped bring out the 'handmade' feel to it.
Gluing the wrapped-over edge to the pop bottle frame required a clamp-system of sorts...
 |
| Clothespins and binder clips are necessary for this step! |
The lining I put in after affixing the outside to the plastic. I forgot to take a photo of that step. I stitched the two parts together (see a later photo) to bridge the gap.
For the ends, I used two recycled plastic lids. I had to dig through the cupboard to find two of the appropriate diameter. Although these won't be seen in the end, I like that the colour coordinated and that the original container held a chickpea product (hummus). You need some sort of plastic frame to keep the ends taught. Cardboard could work too.
I also forgot to photograph it, but I traced two circles (one slightly larger - I used a bowl as a template) for each 'end'. I put the larger circle on first, gluing it and clamping it (much like how I did with the pop bottle). I glued the smaller felt circle inside afterward to hide the rough edges.
For the 'chickpeas', I modified a hacky-sack pattern (original found here). I used DK weight baby yarn and a 3.0mm hook. The modified pattern was:
- Ch 2, put 8 sc in 2nd ch from hook (if you use a place marker, insert it here).
- 2 sc in each sc around
- Alternate 2 sc in a stitch, then 1 sc in a stitch all the way around.
- 2 sc in a stitch, then 1 sc in the next two stitches, repeating all the way around.
- As above, but after the 2 sc, 1 sc in the next three stitches (repeat all the way around).
- Again, but after the 2 sc, 1 sc in the next four stitches (repeat all the way around).
- Once more, but after the 2 sc, 1 sc in the next five stitches (repeat all the way around).
- For four rows, just 1 sc in each stitch all the way around.
- Decrease as you increased, so sc2tog, then 1 sc in the next five stitches (repeat all the way around).
- Same, but 1 sc in the next four....
- Then 1 sc in the next three...
- Then 1 sc in the next two...
- Then alternate sc2tog and 1 sc in each stitch all the way around.
- For the final rounds, sc2tog repeating. Before the hole gets too small, fill with whatever stuffing you choose (I used dried chickpeas / chana dhal, mostly for irony purposes. Any dried bean, lentil or popcorn would work, and recycled plastic pellets would also be a great idea!).
- ....and then when I finished off and wove in the ends, I tried to form the little 'point' at the end of a chickpea.
I made 3 of them and included a little "How to Juggle" printout in the 'can'.
And that's it! Now I have a confession to make - I had originally attempted to put a zippered lid on, but because of the differing diameters, it didn't exactly zip up once I finished stitching it together. So rather embarrassingly, I covered up this little mistake and the lid just kind of sits/fits on. If I had more time, I might have made an insert to stabilize the lid inside the can. But I'll leave that up to you to figure out!
And that's your weird project du jour! Enjoy! CAN you do it too?


Wow, this turned out great!! Well done you!
ReplyDeleteHa! This is awesome! Well done. :)
ReplyDelete