Thursday, July 21, 2011

Westside Pocket Market - Kits Neighbourhood House


I like SPEC, quite a lot. They're good people, those SPECers. I hope they don't mind me re-posting their advertisement here, but I'd like to spread the word!

TODAY from 3pm to 7pm at the Kits Neighbourhood House (7th & Vine) is the Westisde Pocket Market. They run every Thursday at that time, from the 7th of June right through 'til the 8th of September. So if you can't make it today, you've still got time.

And they even feature workshops on "Eating Local on a Budget" and food preservation. Marvellous stuff!

I love the Pocket Market poster, too. As you probably know from earlier posts, I really like the guerilla-gardening, urban-agriculture, victory-garden revival happening, and I especially like the associated artwork.

My beloved joeseppi poster. He's made more - I want!

Joeseppi on Etsy.com is where I got my "Grow Food on an Organic Farm" poster that everyone asks about. And he's got all sorts of new stuff (including backyard chicken temporary tattoos that are MUCH cooler than they sound!). He's a lovely, like-minded individual living States-side in Portland.

There's also a really pretty (I think, anyway) website for J Wirtheim's design studio: http://www.victorygardenoftomorrow.com/

joeseppi on Etsy.com - cool beans. Reasonably priced, too! :)

Check out Joeseppi on Etsy for those temporary tattoos that will make you the coolest farmer's market attendee ever! (There's just one tattoo so far, the chicken (which is awesome), and it's included in a 6 pack of postcards with a few bonus stickers as well. And it costs $6 US, which is UNDER $6 Cdn! Shipping only $2.50, so buy two (one as a gift!) and it works out to be almost exactly $14 Cdn even).

If you buy that 6 postcard set, you could string up some jute twine between two tacks on the wall, and clip on the postcards with mini wooden clothespins like these (I got mine at either YokoYaya/Daiso or a dollar store for MUCH less than that, though). It would cost easily under $10. Tell me that's not a great idea!

(I borrowed this....EatLocal.org)

And while I'm on the urban agri subject, one other reminder about the EatLocal.org farmer's market at Kits High (also where Tenth Church - Kits congregates) on Sundays. (Don't forget about the UBC Farm, too! Saturdays 9am - 1pm).

This may be Vancouver's BummerSummer, but we can still hit up the Farmer's Market, and that's something to be happy about!

Borrowed from EatLocal.org: Vancouver Farmers Markets!

FARMERS MARKETS IN KITSILANO & UBC - 2011

WEDNESDAY:       UBC Bookstore 11:30am - 1:30pm (UBC Farm)
THURSDAY:      Westside Pocket Market @ KNH 7th & Vine 3pm - 7pm (SPEC)
SATURDAY:         UBC Farm 9am - 1pm (UBC Farm)
SUNDAY:            Vancouver Farmer's Market - Kits 10am - 2pm (EatLocal.org)

Got Bugs? Good!

PESTICIDES ARE FOR PUSSIES.

There, I said it. If you're running to the RAID or whatever every time you see a bug on your flowers or veggies, you're making a grave mistake.

Who is this? Read on to find out! (Underside of basil leaves shown)

There are some creepy crawlies that freak me right out, so I understand the aversion. I completely and utterly sympathize with anyone who goes a little buggy over insects!

But not all bugs are bad! Just as "Not all bugs need drugs" (i.e. don't use anti-microbial/anti-bacterial products ad nauseum, or zap a cold with antibiotics which is really stupid) in the healthcare world, in the garden "Not all bugs are slugs". And I can't even say that! For all the harm slugs do to gardens, the beloved native banana slug (very cool!) are actually GOOD for your garden (they're composters and they eat fungus! Read more here). They're also the second largest terrestrial slugs in the world (and they live here in BC!). I have to share this - a link to a banana slug crochet pattern. How awesome is that?!

Aphids, however, are often a problem. And so is whitefly, which is a scourge of greenhouses everywhere and which recently infested my potted basil, which is now summering outdoors and is looking less bug-infested everyday.

Aphids (green, and one brown one) - notice how they've arranged themselves on the leaf veins, sucking out the plant juices, like vegetable vampires

Beyond the limit of my macro lens, but here's a green aphid on my arm.

Other pests I keep on the lookout for are the tomato horn worm, the carrot rust fly, the cabbage butterfly, and those irritating little brown slugs that pig out on your lettuce (which is why I want to have pet ducks like neighbours of mine did - they eat the slugs! Slugs will destroy your lovely hostas, too - beware!).

Unhealthy basil with sticky 'honeydew' residue (from either the whitefly or aphids).

Everyone knows the ladybug (or ladybird beetle) is a garden-helper, eating aphids like it's going out of style. But there are many other predatory insects out there, some of which are raised commercially and sold to pesticide-free greenhouses as a source of organic pest control (and a pretty efficient source too, it should be said!). A few companies around the world like Applied BioNomics in North Saanich, BC breed predatory wasps and other insects for use in BC Hothouses (where the red peppers and tomatoes at the store come from!) and also abroad (biological pest control is HUGE in Europe, and as usual, big business here in North America has been keeping the good stuff from us as long as they can. Same with GMO-free Rice Krispies, but that's a separate rant!).


A friend visiting last month, taking a breather on the mint leaves.

I briefly mentioned ladybugs in my balcony garden, which of course are welcome tenants (well, visitors - they're more like hotel guests). I was starting to have an aphid issue on my bean leaves (I planted borage nearby, and for some reason that normally robust and lovely plant did not do well this season and got sick and aphid-infested. I had to remove all of my borage this year, which is really sad).  

Weird fact of the day: did you know ants "farm" and "milk" aphids for that honeydew? They herd them like cattle, look after them, and eat their sticky poo! Full article on ScienceDaily here.

I wish I had taken a photo, because I was only pointing out the aphids, their eggs, and some mystery eggs that looked like these ("Hopefully predators!", I had said) on the underside of the leaves a week or so ago.

Some little black aphids on the underside of a bean leaf

Today, no more eggs to photograph. Less aphids, too. And more of these weird guys, which at first I feared had come to eat my tomatoes. So I searched for red black larvae (anything squidgey and crawly like that is probably larva), and I discovered the identity of these guys: they're ladybug larvae!

Free aphid-control! Organic and kind of pretty, too (now that I know what it is!).

And they're EVERYWHERE! And where they are, aphids are not. Wonderful! Those eggs I saw were probably ladybug eggs (and I was right in guessing they were predators - much bigger eggs parked right next to a field of other eggs. Lunch would be waiting for them when they hatched! Ladybugs are good moms!).

Pupal stage. Get action figures of this here!

So there you have it - the next time you see a weird bug on your plants, do a quick search before you squash it. It might be there to help! And if it isn't, it might just be a meal for a helpful bug about to swoop in. (If it's on an indoor plant, consider moving that plant outside, if it will stand for it, and let the patrolling troops of the predatory insect brigade clean up the mess for you!).

Thank you for indirectly helping my pasta sauces, little guy!

And as my Dad always used to point out - if you find a bug in your broccoli (or a spider in your green grapes - it's happened to me a couple of times!), it's a GOOD THING. If they were poisoned to death by the product then you'll be poisoned too (it's true - it just takes a lot more to kill us 'cause we're bigger). And if they're alive and kicking, well, it's safe to consume!


Some more Green and Broke buggy friends:

A honeybee!!! Finally! I hadn't seen one in so long. :( (photo: 5 Aug 2011)
Welcome, welcome! :)
Bright green grasshopper that was moving into my apartment!

Long antennae! (Incidentally, bug nets are very useful things to have in places without screens over the windows!

Monday, July 11, 2011

Crochet Pattern: Another Trash Frapp - The Plastic Smoothie


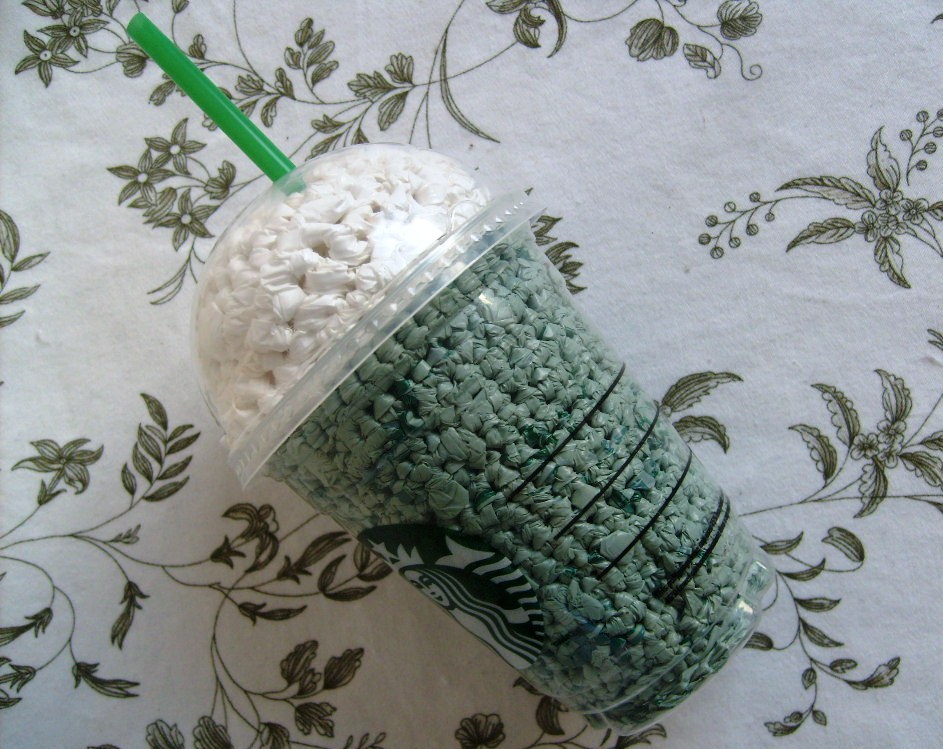
As soon as I envisioned The Original Trash Frapp (I feel like that should have a TM or copyright symbol next to it! Ha! But I share freely, so nevermind!), I also came up with a Green Tea Frapp version since that's truthfully what the original containers held. It's my one occasional Starbucks indulgence, and it tastes so much better than it looks!


I knew exactly what plastic bags I'd need to replicate that sick, chalky green colour (I love that colour, incidentally. It just looks so septic, so why sugar-coat?): the President's Choice/Superstore green plastic grocery bags.


Another Trash Frapp: The Plastic Smoothie
For a smoothie, you'll need different colours than the greens of a Green Tea Frappuccino. Light pinks and yellows are both examples of a difficult colour range to find in plastic grocery bags! A tip right off the bat: if you use the 'loop' method to make plarn (link here / video here) and not the spiral-cut method (where you get one long strip, exactly like how the t-shirt yarn was made in the other tutorial), you can alternate colours by linking loops from several plastic bags in a repeating or randomized order. This will give a slightly stripy effect to the work (think something like this - striped orange and pinkish sedimentary rocks in Arizona), though it won't be nearly as bold as it would if you were to connect the long strips of plastic from the spiral-cut method (this one has the potential to make your smoothie look like it has different layers, like this - layered Jell-o parfaits).

Multi-coloured bag smoothie

Materials:
- empty frappuccino container, domed lid and straw (all washed and dried, of course! No stickiness, no germs!)
- a bunch of plarn in the colour(s) of your choice (see note above on how to do this)
- some white (or primarily white) coloured plarn for the whipped cream
- scissors
- glue (optional)
- appropriately sized hook (I used 3.0mm for the frapp, 4.0mm for the whipped cream).

So, as with the original, these are GUIDELINES only. You might have to make adjustments as necessary (don't be alarmed - they'll be easy! If it starts getting too wide, undo a bit and don't put in as many increases, or do a few more rows of sc only before increasing at all. If it doesn't fit up against the sides of the cup, it's too narrow and needs more increases (undo some, and increase here and there by doing 2sc in a st, instead of just 1 sc in a st). This is part of the fun, and I promise no one will go back and count your stitches to see if you 'screwed up' anywhere!)

For the frapp or smoothie part:


Round 1: ch 2, sc 8
Round 2: sc in each st around
Rounds 3-6: 2 sc in each st around
Round 7: Front Loops Only - sc in each st around
Rounds 8-10: sc in each st around (there are 6 sc rounds from the base or so. I added the odd random decrease (sc2tog) as the plastic stretched and the shape widened too much, but this will vary depending on your tension and the plarn used)
Round 11: sc around about 1/3 of the way. 2 sc in the next st. Then continue to sc in each st until a point approximately 2/3 of the way around. 2 sc in the next st. Continue to sc in each st until the last stitch (2 sc in the last st)
Round 12: sc in each st for a full round
Round 13: repeat round 11
Rounds 14-16: sc in each st for a full round
Round 17: repeat round 11 again
Round 18: sc in each st for a full round
Rounds 19-21: sc to height
Round 22: sl st around to finish off the final round. Weave in ends.


Before assembling (i.e. before stuffing the 'frapp' into the cup), use some additional plarn and chain a length long enough to encircle the bottom of the cup. This helps to minimize the gap between the main body of the drink and the plastic cup.


For the whipped cream topping, I simply followed the pattern here (Spiral Scrubbie, by Judith Prindle), with a change in the hook size (4.0mm) and obviously replacing plarn with the worsted weight yarn. I found it from Norma Lynn Hood's 'Cake Sachet' pattern on Ravelry (which is too small for this project).


I didn't connect the spiral to make it flat as the pattern suggests, and I left room in the top for a straw. I turned the otherside up and under after partially (but not completely) cinching it closed as the pattern suggests.


Work in straw through the hole in the centre of the 'whipped cream'. You can glue the whipped cream to the domed lid and straw (definitely recommend gluing the straw to the whipped cream at the very least), so that the 'lid' of the smoothie is made up of all 3 parts (whipped cream, straw and domed lid). Or you can leave the pieces unattached, depending on the final intended usage of the plarn smoothie container.


And there you have it! Delicious and calorie-free. And it cost nothing (well, I suppose making the plastic in the first place 'cost' our planet something as it destroyed the air and wasted valuable natural resources, but let's not get too depressed now! The plastic smoothie was free, it reused wasteful, nasty plastic to make something new, and when we no longer have a use for our little plastic smoothie, we can take it apart and recycle the cup and perhaps the rest of the plastic, too).


**************************************************
LATE ADDITION: The No-Whip Top


Round 1: ch 8, sl st into first ch.
Round 2: ch 1, sc into ring 12 times, sl st to join round.
Round 3: ch 1, 2 sc into each st, sl st to join
Round 4: ch 1, (2 sc into first stitch, 1 sc in next) repeat around (sl st to join)
Round 5: ch 1, (2 sc into first st, 1 sc in next 2 st), repeat around circle (sl st to join)
Round 6: ch 1, (2 sc into first st, 1 sc in next 3 st), repeat around circle (sl st to join)
Round 7: ch 1, (2 sc into first st, 1 sc in next 4 st), repeat around circle (sl st to join)
Continue pattern until desired size is reached, following the pattern (increase the number of 1 sc st sets by one each round).
Finishing off: sl st around edge. Weave in ends.

(Incidentally, if I was to re-do this pattern, I'd make the hole for the straw smaller, maybe ch 6 in the beginning instead of 8 for this size of straw). 

Crochet Pattern: Recycled, Upcycled Frappuccino (or "The Trash Frapp")

...this one was for Annie, who asked why my desk was accumulating empties...


There are endless possibilities for every article of refuse, trash, or recyclables.

There are also endless possibilities for unwanted clothing and fabrics.

Here's just one way to put an empty, environmentally sinful drink container and an undesirable t-shirt (it shrunk) to good use. There are endless other ways (honestly!). Hopefully some of my bizarre little projects inspire you to try creating something of your own. The beauty of using things that would otherwise be thrown out or given away is that there is no cost to your little 'experiment', and if it turns out hideous, you can simply recycle it and forget it ever happened. Risk free art!


I made this little recycled-materials project into a coin bank (yep, even that ribbon was reused! Nice!) for a coffee savings fund. It works nicely on a desk, in the break room at work, or even in one of the many cup holders in your vehicle, in which case it serves to keep parking meter change within easy reach! 


You could also omit cutting a coin slot in the lid and use this cute little container to hold jewelry or hair accessories to tidy up a vanity. Or for holding paper clips and pens on a desk. Or fill it with coffee beans for an air-freshener (this is a great way to use up beans you don't like, or beans that fell on the floor...!).

You could also use the Trash Frapp to store charging cables and earphones (coiled up), which I find hard to store neatly. I've got a veritable vipers nest of cords, cables and wires in a desk drawer for my camera, iPod, etc. (Note to self - make another Trash Frapp!).

Or the whole thing could simply serve as packaging for a gift certificate to a friend's favourite cafe.

I made it just 'cause I could. And to show off my recycling skills. I feel this can be all the rationale one needs!


The Trash Frapp: Coffee-Fund Coin Bank
These instructions should be loosely followed, according to several variable factors: the thickness and consistency of the 'yarn' being used, how tightly/loosely you crochet (gauge will vary!), and of course the exact shape and size of your beverage container. Please keep in mind that these are guidelines, and that the true joy in creating a craft like this lies in the 'executive decisions' you make while creating your art! If it's looking too wonky here, or is getting a bit wide there, adapt! Add another increase, or another row of sc only, or be very scientific about the whole thing and bring in a level of precision that I have not - whatever works for you is the right way to do it! Enjoy the creative process!

Materials:
- empty drink container (preferrably transparent, so you'll be able to see your hard work!) with lid
- t-shirt yarn* (or other very thick yarn in a coffee-like colour)
- 6.00mm crochet hook (may vary depending on thickness of your 'yarn')
- scissors (of course!)
- sharp knife/blade (for cutting a coin slot into the lid if you are making a coffee-fund change bank)

*Don't be intimidated! Here's a great video to show you how to make t-shirt 'yarn'. No ironing board - I did it while watching TV on the couch. Easy peasy.

For my Trash Frapp Coin Bank, I did the following (I think - I wasn't counting stitches, but I did try to keep track and take notes as I went):

Round 1: ch 5, sl st into first ch
Round 2: ch 1, 2 sc in each st
Round 3: (repeat round 2)
Round 4: front loops only (FLO): ch 2, sc around (1 in each st)
Round 5: back loops only (BLO): ch1, sc around (1 in each st)
Round 6: BLO: (sc in each st) x 4, 2 sc in next. Repeat.
Round 7: BLO: sc in each st around
Round 8: BLO: sc in each st until halfway point (then 2 sc in next stitch). Then sc in each st until end: 2 sc in last st
Round 9: increase by 2 st this round (sc around, then to balance out shape, 2 sc in a st twice in the round). I did this at the 1/4 and 3/4 marks to compliment the slight bulging from last round at the 1/2 and end area. (On a clock dial, this would be 3 o'clock and 9 o'clock, because the inc in round 8 were at 6 o'clock and midnight)
Round 10: Repeat round 9, but place the 2 sc increases in new positions to help correct any bulge (i.e. 1 o'clock and 7 o'clock)
Round 11: Repeat same again, but move those two 2 sc inc (i.e. 2 o'clock and 10 o'clock positions) - use your judgment to see where you need to bring up the height.
Round 12 (last one - add more between 11 and 12 if you're not close enough to the rim!): sl st all the way around - it can help to even out the top where bulges may have formed by increasing. Finish off by cutting the yarn and weaving in the ends 'til you can't see the tail. Pop on the lid and voila!

I have to confess that I started working in rounds (i.e. ch 1 before starting the next 'level') and then got lazy and started working in a spiral fashion. I've tried to retroactively adjust this pattern, but please keep this in mind if it gets extra wonky on you! This is 'art', not a tailored sweater, so be sure to make any adjustments as you go (as you see fit)! You're the boss - tell that t-yarn where to go!

Oh right - the bottom of the cup didn't look 'full' (there was a gap), so I cut a length of the t-yarn and coiled it around the bottom before pushing in the crocheted frappuccino. It helped the overall appearance quite a bit.

When cutting a coin slot into the lid, do make sure you're very careful and don't slip with the knife/blade. (I've done this before - it sucks, and you feel like a twit. I can only imagine it would be even more embarrassing if you end up requiring stitches! Do your pride a favour and cut the plastic carefully!). Make sure the surface below the plastic lid is expendable - I recommend using a cutting board or a stack of paper or a cereal box or something to save your table below. I found it easiest to cut from the inside of the lid (I turned it upside down on the cutting board), so that the plastic I was cutting sat flat against the cutting board. This gave me the best control, and I didn't have to contend with the plastic bowing and bending as I cut it (which wouldn't give as straight a line, I'm sure).
 

If you don't have any ribbon on hand with which to tie a bow around this little gift, why not use the leftover hem from the t-shirt you made the yarn from to make a bow?


When you are finished using this little Trash Frapp, please remember to recycle the component parts (i.e. put the cup part in with the plastics recycling), or reuse it again (plant a seedling in the cup after you poke in a drainage hole or two, and unravel the t-shirt yarn for another project, or for use as plant ties, or in place of ribbon for gift wrap, or some rather unusual shoelaces, or just a convenient ball of 'twine' for your toolkit, or.....!).

Sunday, July 3, 2011

Crochet/Sewing Pattern: Can of Chickpeas

...for Chantal...

This was supposed to be an all-crochet pattern, but I ran out of time and also couldn't find grey yarn at Dressew.

One of my oldest friends is having a baby, and she doesn't know the gender. So for her shower, I asked if there was a theme for the baby gifts (i.e. froggies, or duckies, etc.). She said "chickpeas" just to mess with me. I accepted the challenge, and I made this:


It's a plush can of chickpeas (but of course you could make it peas, or chicken noodle soup, or peaches, or whatever else comes in a can).


If you wanted to make one, I used an empty 2L pop bottle, and cut off the ends to form an open cylinder.


I bought felt from Dressew for $0.49 per sheet. The best part was that the felt is made from 100% recycled pop bottles - it's called eco-fi (link here to their website). Cheap and green!


If it was a full crochet pattern, I would make two circles for each end (from a pattern like this), and for the cylinder (sides), I would chain until it reached the width of the pop bottle cylinder, and then single crochet back and forth to make a rectangle long enough to overlap. (You'd have to make two of them - one slightly shorter in length to go inside the pop bottle frame).


Jagged plastic edges grabs at the felt, so masking tape came in handy.

The felt wasn't quite long enough to wrap around the bottle, so I had to join two pieces. I used Aleene's Tacky Glue (every craft drawer should have this glue!), and I also hand stitched the seam.


Next, I pinned and glued the sheet around the pop bottle frame.


And I made a similar one for the inside.


To make the label, I marked where on the 'can' portion I thought the label should sit, and cut the white felt (my label backdrop) to this width. I glued and stitched over the seam as before.


I think the best part of this project was designing and stitching together the label. Bold colours and clean lines create the boldest effect.


Top-stitching over the felt shapes helped secure them (I glued them first), and also really helped bring out the 'handmade' feel to it.


Gluing the wrapped-over edge to the pop bottle frame required a clamp-system of sorts...

Clothespins and binder clips are necessary for this step!


The lining I put in after affixing the outside to the plastic. I forgot to take a photo of that step. I stitched the two parts together (see a later photo) to bridge the gap.


For the ends, I used two recycled plastic lids. I had to dig through the cupboard to find two of the appropriate diameter. Although these won't be seen in the end, I like that the colour coordinated and that the original container held a chickpea product (hummus). You need some sort of plastic frame to keep the ends taught. Cardboard could work too.

I also forgot to photograph it, but I traced two circles (one slightly larger - I used a bowl as a template) for each 'end'. I put the larger circle on first, gluing it and clamping it (much like how I did with the pop bottle). I glued the smaller felt circle inside afterward to hide the rough edges.


For the 'chickpeas', I modified a hacky-sack pattern (original found here). I used DK weight baby yarn and a 3.0mm hook. The modified pattern was:

  1. Ch 2, put 8 sc in 2nd ch from hook (if you use a place marker, insert it here).
  2. 2 sc in each sc around
  3. Alternate 2 sc in a stitch, then 1 sc in a stitch all the way around.
  4. 2 sc in a stitch, then 1 sc in the next two stitches, repeating all the way around.
  5. As above, but after the 2 sc, 1 sc in the next three stitches (repeat all the way around).
  6. Again, but after the 2 sc, 1 sc in the next four stitches (repeat all the way around).
  7. Once more, but after the 2 sc, 1 sc in the next five stitches (repeat all the way around).
  8. For four rows, just 1 sc in each stitch all the way around. 
  9. Decrease as you increased, so sc2tog, then 1 sc in the next five stitches (repeat all the way around).
  10. Same, but 1 sc in the next four....
  11. Then 1 sc in the next three...
  12. Then 1 sc in the next two...
  13. Then alternate sc2tog and 1 sc in each stitch all the way around.
  14. For the final rounds, sc2tog repeating. Before the hole gets too small, fill with whatever stuffing you choose (I used dried chickpeas / chana dhal, mostly for irony purposes. Any dried bean, lentil or popcorn would work, and recycled plastic pellets would also be a great idea!).
  15. ....and then when I finished off and wove in the ends, I tried to form the little 'point' at the end of a chickpea.


I made 3 of them and included a little "How to Juggle" printout in the 'can'.


And that's it! Now I have a confession to make - I had originally attempted to put a zippered lid on, but because of the differing diameters, it didn't exactly zip up once I finished stitching it together. So rather embarrassingly, I covered up this little mistake and the lid just kind of sits/fits on. If I had more time, I might have made an insert to stabilize the lid inside the can. But I'll leave that up to you to figure out!


And that's your weird project du jour! Enjoy! CAN you do it too?