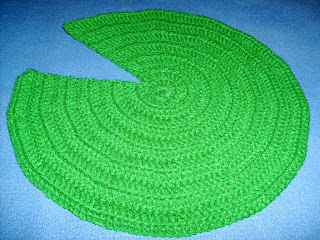
The lily pad pictured measures about 20 cm (8") in diameter. I used a 6.0mm hook (J) and worsted weight acrylic from my stash (not quite a full skein, maybe 75 grams?).
Lily Pad Pattern:
- Ch 4. Make 12 dc's in furthest chain from hook, and join round at top of the ch 3 with a sl st.
- Ch 3 and dc in same stitch. Make 2 dc's in top of each of the next dc's of the previous round, except for the very last stitch - pause here! (22 dc).
- Ch 3 and turn; dc in same st. Make 1 dc in next stitch. (Next stitch 2 dc, following stitch 1 dc)*. *repeat until you reach the end of the previous round.
- Ch 3 and turn; dc in same st. Make 1 dc in each of the next two st. (Next st 2 dc, 1 dc in each of next 2 st)*. * repeat until you reach the end of the the previous round.
- Ch 3 and turn; dc in same st. Make 1 dc in each of the next three st. (Next st 2 dc, 1 dc in each of next 3 st)*. *repeat until you reach the end of the previous round.
- Ch 3 and turn; dc in same st. Make 1 dc in each of the next four st. (Next st 2 dc, 1 dc in each of next 4 st)*. *repeat until you reach the end of the previous round.
- By now you can probably guess the pattern! 2 dc's, then dc in each of the next (5-10) st. Continue to increase the dc's between the twinned dc's by one each round until you've reached the desired size.
- Ch 1 and turn; sc along circumference of the lily pad, and fasten off end (sew in tail with yarn needle).


Do you have a pattern that is a complete circle?
ReplyDeleteHi Chris,
ReplyDeleteCrochetSpot.com has a simple circle pattern!
http://www.crochetspot.com/crochet-pattern-extra-large-coaster/
:)
This is a great pattern. I could see using these for sitting mats for my Sunday School classroom. Thank you!
ReplyDeleteThanks, hmltwin!
ReplyDeleteWhat a great use (awww, sooo cute!)! Thanks for sharing that! :)
How could I triple the size?
ReplyDeleteWell, you could just keep going with the pattern and not finish where I suggested! :)
ReplyDeleteQuoting line 7: "By now you can probably guess the pattern! 2 dc's, then dc in each of the next (5-10) st. Continue to increase the dc's between the twinned dc's by one each round until you've reached the desired size."
So your desired size is much larger! Keep going! ;)
One word of caution, though - you can see that the pattern will generate undesired "corners" and "straight edges" because of those "2 dc" spots.
To minimize that, just change where you do the "2 dc" to partway along a "edge". For example, if your last iteration was "2dc in same st, then 1 dc in the next 10 st", you may wish to start the next round by adding the "2dc" increase at the 6th dc along. THEN count 11 dc's (one in each st), and increase with the "2dc in the same st". Then just continue the "2dc, 1 dc in each of the next 11" pattern until you reach the end (then turn and continue with the next).
That way you've offset where the increases are and have hopefully kept the outer edge nice and round! If you don't try to offset, you'll end up with something that begins to look like an octagon...!
(Alternatively, you could just go for some SERIOUSLY thick yarn and a big, fat crochet hook! It'll be bigger that way, but so will the stitches). ;)
I am trying to make it big enough to set a baby on top of. I already made the frog hat for the newborn! These directions are a lot, but maybe when I start doing it, it will make more sense. Thanks for getting back to me so quickly!
ReplyDelete